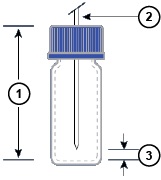
If the needle is placed too high, it may not draw enough sample. If the needle is placed too low, it elevates the risk of introducing debris or precipitates into the system fluidics.
Needle placement is the vertical distance from the tip of the sample needle to the bottom of the sample vial. The default setting for the needle placement prevents the needle from reaching the bottom of the vial.
You can change the default needle-placement setting in the software in two places: on the Dilution tab of the Sample Manager instrument method editor and in the Advanced Settings dialog box.
| Plate type | Default |
|---|---|
| 48-vial | 4.0 mm (automatic) |
| All other plates | 2.0 mm |
 in the figure below.


Need Help? Connect with a Waters expert.
To avoid risk of personal injury and to prevent damage to laboratory equipment, always operate your Waters products in accordance with the applicable operational and safety information, your organization’s standard operating procedures, and local regulations.
Refer to the English version of this page for the latest information.