Installing the column

Installing the column
Topic LCI-USG-0007, Last Updated 11/08/2024

Install the column in the CHC prior to running samples.

Fittings and column clips are designed to be intuitive when installing a column in the Alliance iS Column Heater Cooler (CHC).

Note: Power-on the system before installing the column to ensure proper RF column identification when the CHC door is closed. See Powering-on the system.
  1. Open the column compartment door.
  2. Move the lower column clip as necessary to match the size of the column.
  3. Remove the plugs from the inlet and outlet ends of the column.
  4. Orient the column so that the outlet faces up (see the arrow on the column) and the inlet faces down.
  5. Screw the fittings on the column compartment tubing finger-tight to the column inlet and outlet.
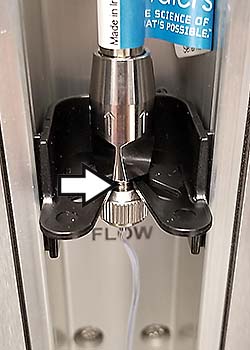
  6. Insert the column into the upper and lower clips so that the clip grasps the exposed threads on the fitting.
    Figure 1: Column seated in column clip
  7. Close the column compartment door.

Need Help? Connect with a Waters expert. 


To avoid risk of personal injury and to prevent damage to laboratory equipment, always operate your Waters products in accordance with the applicable operational and safety information, your organization’s standard operating procedures, and local regulations.

Refer to the English version of this page for the latest information.

Back To Top Back To Top