Choosing the needle-placement setting

Choosing the needle-placement setting
Topic LCI-USG-0091, 最近更新 11/22/2024

If the needle is placed too high, it may not draw enough sample. If the needle is placed too low, it elevates the risk of introducing debris or precipitates into the system fluidics.

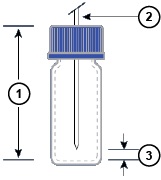
Needle placement is the vertical distance from the tip of the sample needle to the bottom of the sample vial. The default setting for the needle placement prevents the needle from reaching the bottom of the vial.

Note: To avoid damaging the needle, follow the guidelines in this section, ensure that the needle is calibrated, and use the appropriate needle-placement setting for your sample plates or vials.

You can change the default needle-placement setting in the software in two places: on the Dilution tab of the Sample Manager instrument method editor and in the Advanced Settings dialog box.

Table 1. Default needle-placement settings
Plate type Default
48-vial 4.0 mm (automatic)
All other plates 2.0 mm
Note: The default needle-placement values listed in the table above represent the dimension specified by in the figure below.
Figure 1: Sample needle in vial
Vial depth
Sample needle
Distance from tip of sample needle to bottom of sample vial

需要協助嗎?聯絡Waters專家。 


為避免引起人身傷害的風險和防止損壞實驗室設備,操作Waters產品時,請務必一律按照適用的操作和安全資訊,也務必遵守您所在組織的標準作業程序和當地法規。

回到頁首 回到頁首